Things You Didn't Know About Reaper Videos
These are very brief notes from the videos at the moment. They are more reminders of the contents, with the idea that these should be all you need to remind yourself of them, once you are already familiar with them. If unfamiliar, see the Kenny video linked for a full explanation.
1
Project Templates
- Save Project as Template
- Can set project template as default
Track Templates
- Can have multipe tracks, with/without items.
- SWS actions to append, resources slots, see here about adding more slot actions.
FX Chains
-
Save selected/all as FX Chain.
-
SWS actions to apply, append, etc.
-
Default FX chain. Project Tabs
-
We can copy/paste between projects.
-
Hold shift when opening recent projects, opens in new tab.
Flexible Snap Distance
- With grid on, by default, item start snaps to grid.
- Shift can bypass snap.
- Can turn off snap to grid at any distance, and then it only snaps when close.
Snap Relative To Grid
- Move by grid steps, rather than move to grid.
Snap Offset For Item
- At bottom of item, by default bottom left.
2
Take FX
- We can also have an FX chain in a take.
- We can apply the take FX to get a new take (bypass track FX when doing this)
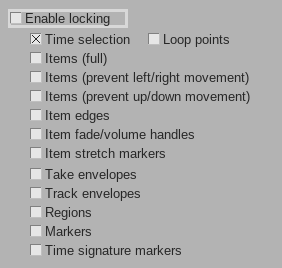
Locking
- Lock toolbar item. We can lock a few things:
Volume Knob On Item
- We can adjust each item separately.
- We can split an item and adjust each.
- These adjust the levels going into track fx, whereas track volume is post fx.
Record And Comping In Lanes (new in v7)
- By default recording over adds new takes.
- If we split an item, this splits all takes at the same places.
- Options→Overlapping recording behaviour→Add lanes (/in layers)
- If we split, it only splits the item in that lane, which we can edit independently.
- Right click lane buttons, Comping→Comp into new empty lane.
- Drag to create comp areas.
- With lanes, T toggles which lane appears in a comp region.
- Disable non playing lanes, and the result looks like a regular track.
3
Render Queue
- Open Render Window
- Adjust settings
- Bottom left: Queue to add to render queue
- Repeat as needed
- File→Queued Renders
Dry Render Run
- Render window next to render button.
Post Processing
- Normalise after render
- After dry run we can see what normlise would do
Solo In Front
- Options→Solo In Front
- Adjust level via Preferences→Audio→Mute/Solo
- Actions: Adjust solo in front (MIDI CC/Mousewheel)
Adjust Last Touched FX Parameter
- Actions: Adjust last touched...
- Map to Midi relative
4
Soloing Items Under Mouse
- Actions List: "solo item"
- SWS Extensions add a few:
- Toggle play from edit cursor and solo...
- With mouse over item, item is soloed; with mouse over TCP, that track is soloed; with mouse over empty part of track, that track is soloed.
- Four actions: two solo items or tracks; two solo only tracks; two start from edit cursor; two start from mouse cursor.
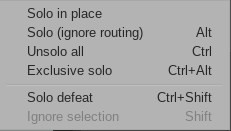
Soloing Defeat, Record Disable
- If we always want to hear drums when soloing, for example:
- Select tracks, right click solo, select solo defeat. (C-S-click)
- Note solo clicks:
Record Disable
- If we want to monitor something like a microphone for talkback without recording, we can record disable and record arm.
- We can also put an instrument on such a track, so we can play along without recording.
5
Preview audio through track.
- IO button next to play/stop buttons
Delta Solo
- Right click wet/dry control
Dragging FX to empty track control panel
- Shift+F to open FX browser. Drag and drop.
6
Folders
- Moving Tracks to a New Folder
- Old school: insert new track, press folder buttons.
- New methods:
- Grab tracks and drag to the target track/folder icon.
- Preferences (Editing Behaviour→Mouse) configure dragging behaviour.
- Or: Right Click, Move tracks to folder→New folder track
- And then existing folders turn up in the Move tracks to folder menu.
- Hiding Folder Contents
- Rather than collapsing, in Prefs→Appearance→TCPs and set Folder collapse button cycles...
- Actions:
- Filter for 'folder', e.g.
- Track: Cycle folder collapsed state
- Track: Show/Hide children... Fix Timing of Note
- Filter for 'folder', e.g.
- Split a bit before and after, and drag item
- Split a bit before and after, and alt-drag, use shift to adjust split point
- Use stretch marker (S-w): one before hit, one at start of hit, and one after hit, and then move start of hit
Visual Track Spacers
- Right click TCP, Visual spacer→Insert spacer before/after tracks
- Similar to remove spacers
- In Pref→Appearance: Visual track spacer size
7
Show FX or Sends in the TCP
- Options→Show FX inserts/sends in TCP (when size permits)
- Theme Adjuster:
- To make tracks with/without inserts/sends look more uniform, Track Controls and pin inserts.
- Here:

- Can do similar for sends (inserts on right, sends below)
- Actions:
- Show FX inserts/sends in TCP (when size permits) is an action.
- Can make a custom action to toggle both.
Show FX Controls in TCP
- In FX UI window: Param→Show in track controls
- Or: touch control, then click Show under last touched
- Alt-click control in TCP to hide.
Show FX User Interface in TCP or Mixer
- In FX UI, Right click in FX list: Show embedded UI in TCP/MCP
- Or right click insert in TCP for same menu
- Most useful with Reaeq, as Realimit and Recomp only show threshold control
- Reacomp:
- Drag to adjust threshold
- S-Drag to adjust wet
- A-Drag to adjust ratio
- Can do the same in the mixer
8
Creating Multiple Sends
- Select multiple tracks, S-drag route button.
- or with them selected, right click routing on any, chose Sends and select target
- we can do likewise with receives
- or with them selected, shift click on the sends region of the mixer
- we can drag and drop sends to duplidate
Adding FX to Multiple Tracks
- To add an effect, use FX browser.
- To add an effect to multiple tracks, select tracks, then in FX browser right click an FX and select add to selected tracks
- We can do this with FX chains in the FX Chain section of the FX browser
In Prefs, Track/Send Defaults
- Default send gain
- Default inputs for new tracks
- To add effects by default, save a default FX chain
Keyboard Shortcuts for FX and FX Chains
- Open FX browser, find an effect, right click the effect (or fx chain), choose create shortcut.
9
Pooled Midi Items
- Sometimes we want multiple midi items to have the same contents. For that we use pooled midi items.
- C-A-S-drag makes a pooled copy.
- To unpool, click the pool icon at the top of the item.
Pooled Automation Items
- Example. V to open volume env. Make some automation. Create automation item: Alt-drag in the automation lane to create an automation item. Then C-A-drag to create pooled copies.
Parameter Modulation using LFO
- Touch parameter. Param button/menu, select Parameter Modulation/Link.
10
Resetting Everything
- Select all tracks
- Actions: remove all envelopes (SWS)
- Drag all faders to 0 and back up.
- Double click to set to 0dB
- Double click a pan to reset all
- Actions: Clear FX chains for selected items (SWS)
- View→Project Media/FX Bay
- Choose FX tab
- Select all, press delete
Splitting Items Under Mouse
- Ordinary way to split: click to move edit cursor, press S
- Faster way:
- Actions, search for
split - e.g. Split item under mouse cursor, select right
- assign to key
- Actions, search for
- Trim left/right to mouse cursor
- Custom actions:
- View: Move edit cursor to mouse cursor
- Item edit: Trim left edge...
Freezing Tracks (Up to Point)
- If FX take up too much CPU.
- Select tracks, right click, Render/Freeze tracks→Freeze...
- Can then unfreeze
- Suppose we are happy with some FX, but want to tweak others.
- In FX Chain window
- Choose last effect we want to freeze
- Right click that FX
- Freeze track→Freeze, up to last selected FX
- Freeze works like a stack, so we can partial freeze multiple times.